This is Part 2 of a two-part article on process capability. Part 1 addressed the concept of process capability and how to calculate it, including what to do with data that is normal and non-normal. Part 2 looks at failure rates and material conditions for a surface finish example.
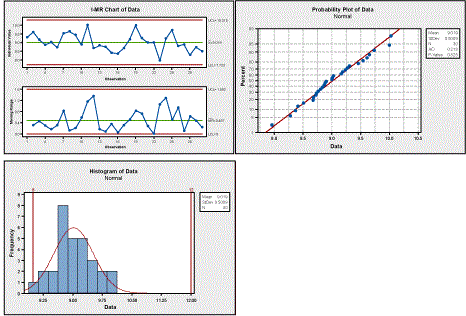
Sometimes, a process has specifications that are one-sided such as flatness, perpendicularity, surface finish and roundness. When assessing process capability in those cases, you will actually be looking at the process capability for one half of the distribution – the half that’s not cut off by the boundary specification. Develop the control chart (ImR), the normal probability plot and then assess process capability. Here is an example of a capability study of surface finish.
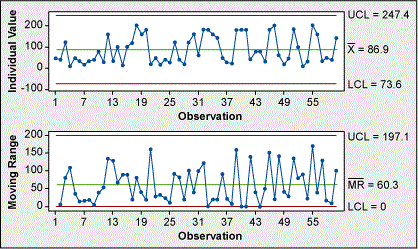
The control chart is stable and in control (Figure 1).
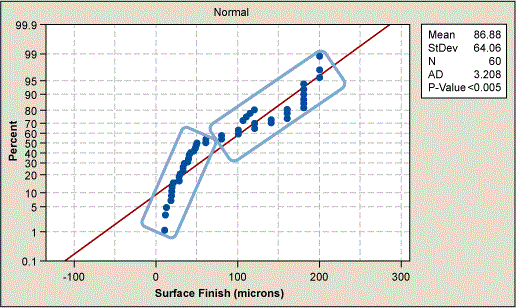
There seems to be an issue with the normal probability plot (Figure 2). The data is non-normal. Investigating the data a little further reveals that the shape appears to be asymptotic as it approaches zero; and the right side of the data follow a line fairly well. The probability density function (PDF) of this data would look like half of a normal PDF.
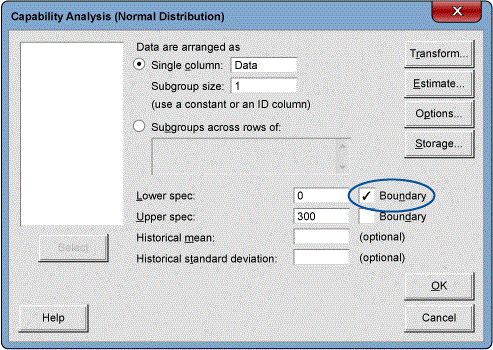
In this case, there is no value in estimating the Cpk(lower) as zero is a physical limit and the most desirable condition. For example, surface finish cannot get better than zero. In this case, report only Cpk(upper). When analyzing this data, the 0/lower spec is selected as a boundary. This tells the software to only estimate Cpk(lower).
Estimating Failure Rate from Cpk
If there is a process that:
- Has an average of 9.02 ml
- Has a standard deviation of 0.5 ml
- Has an upper specification limit (USL) of 12 ml
- Has a lower specification limit (LSL) of 8 ml
- Is stable and in control
- Has data that follows a normal distribution
then process capability can be calculated.
Assess the Cpk to see that the number is .79 as Cpk(lower) (.79) > Cpk(upper) (2.30). The Z score, sometimes called sigma level, can be used to predict failure rate. Z score can be calculated easily. Z is similar to Cpk where Xi is the specification limit.
![]()
where by observation it is shown that Z is 3 times Cpk.
Z(upper) is 5.95 and Z(lower) is 2.03. Look up these values on a standard normal table to get the probability of exceeding these values. The probability to fail on the upper side is 0 as shown in Figure 5 below. The probability to fail on the lower side is 2.095 percent. Convert this to parts per million (PPM) and get a 20,950 PPM fail rate.
Thus far, the focus has been on potential capability or short-term capability. Over time, in each instance, a batch of material is sampled; the sample generates a distribution that is shifted from the previous sample distribution. When all this data is pooled, the distribution is wider. This leads to Pp and Ppk. Ppk is long-term process capability. It is sometimes called process performance. It includes all the data from a number of samplings. The only difference in the math between short-term Cpk(upper) and long-term Ppk is how standard deviation is estimated. Cpk(upper) uses a control chart method to estimate standard deviation, ![]() as with an ImR chart and Ppk uses the sum of squares estimate,
as with an ImR chart and Ppk uses the sum of squares estimate,  as with a
 ![]() chart.
chart.
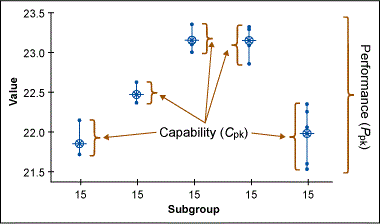
Both Cpk and Ppk require the process to be stable and in control to be valid. If the process is stable and in control, it makes little numerical difference which estimate of capability is used. What is most important is that that the data is sampled such that it includes expected variations and noise conditions. Many organizations require short term Cpk’s to be higher than long term Ppk’s – usually by a factor of 1.5 standard deviations – to guard against missed variation and normal shift and drift. It is common to expect the average of samples to vary by ±1.5 σ.
Maximum Material Condition or Least Material Condition True Position Capability
The traditional process capability measures run into trouble when there is a maximum material condition or least material condition true position specification.
Figure 6 shows the Geometric Dimensions & Tolerancing (GD&T) feature control frame. (Refer to ASME Y14.5-2009 for details.) This defines the size, location for the hole in the surface finish example.
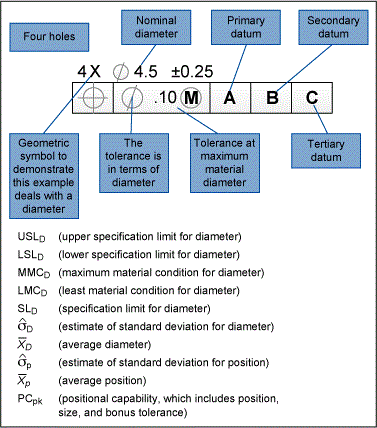
In a situation like this, the diameter and position are not independent. This is an issue because independence is a requirement for Cpk, Cp, Ppk and Pp. This requires the use of multivariate analysis.
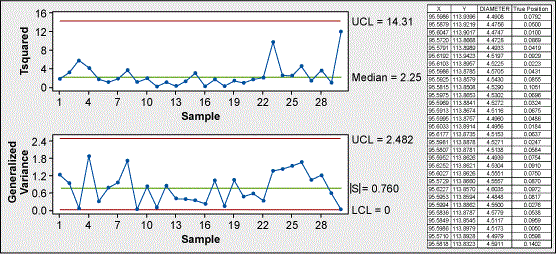
Rather than using an ImR chart to test for stability, use a T2 – generalized variance chart. The generalized variance chart is treated like the range chart in terms of assessing stability and the T2 chart is used to assess control. This process is stable and in control. In this example, the data is given in the form of diameter, true position.
| Table 1: Example Data | ||
| X nom | Y nom | Dia nom |
| 95.6000 | 113.9000 | 4.6500 |
| Table 2: More Example Data | |||
| Variable | Count | Mean | StDev |
| X | 30 | 95.595 | 0.0144 |
| Y | 30 | 113.88 | 0.0249 |
| Diameter | 30 | 4.5226 | 0.0341 |
| True Position | 30 | 0.06300 | 0.03168 |
Data Is in the Form of (X,Y) Coordinates
If the metrologist reports the sample data in X, Y coordinates, the process is highly simplified. Even better, Minitab has a macro for release 17 to do the analysis called POSCAP.MAC.
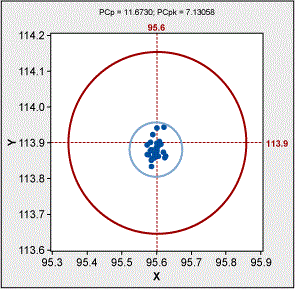
Which leads to a PCpk of 7.13.
In order to use Minitab you must obtain the macro POSCAP.MAC. Contact Minitab help to do this. Then save this macro in your macro folder. Once the macro is stored in the correct location, be sure to enable commands as shown in Figure 9.

The total diameter tolerance was calculated to be 0.51.
To run the macro, type the following at the command prompt (MTB>)
MTB > %poscap c1 c2 0.51;
SUBC> Nominal 95.6 113.9
The default nominal for the X and Y coordinates is (0, 0). A different nominal value can be entered for the X, Y coordinates as in this case (95.6, 113.9). Even if only one of the nominal values is nonzero, both nominal values must be entered.
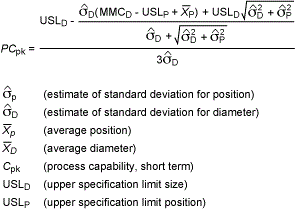
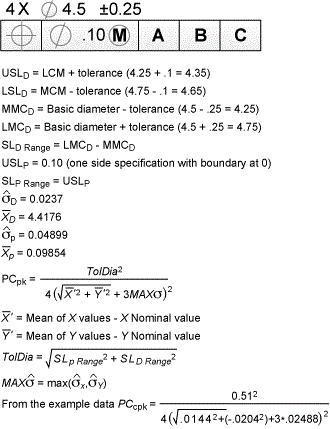
The macro provides two outputs based on two analyses. It gives a traditional capability based on the location from nominal. It is a one-sided capability with 0 being the boundary. Please note that this is an analysis of location only. It does not include size or bonus tolerance. In essence, it does the calculation shown in the equations and Figure 10 below. It is a boundary condition at 0 so it only reports a Cpk(upper). The macro reports this as offset.

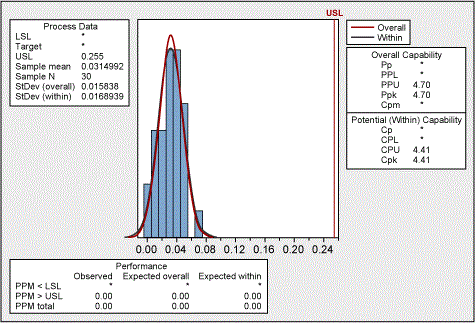
The second output from the macro is the PCpk result along with a X, Y scatter plot. It overlays two circles: one centered at nominal and representing the tolerance diameter, the other centered at the mean (X, Y) coordinates which represents the process variation. This calculation includes size, position and bonus tolerance. It is a true representation of process capability for a MMC or LMC callout.
If your data is in form of diameter, true position then the calculation becomes cumbersome and is not supported by a macro. It is highly beneficial for your metrologist to report the data in X, Y coordinates. The following are the calculations for diameter, true position format:
Resources
- Berardinelli, Carl. “A Guide to Control Charts,” iSixSigma.com. Accessed March 30, 2017. https://www.isixsigma.com/tools-templates/control-charts/a-guide-to-control-charts/.
- Berardinelli, Carl. “Multivariate Control Charts: T2 and Generalized Variance,” iSixSigma.com. Accessed March 30, 2017. https://www.isixsigma.com/tools-templates/control-charts/multivariate-control-charts-t2-and-generalized-variance/.
- Berardinelli, Carl. “Using Control Charts or Pre-control Charts,” iSixSigma.com. Accessed March 30, 2017. https://www.isixsigma.com/tools-templates/control-charts/using-control-charts-or-pre-control-charts/.
- Berardinelli, Carl and Yerian, Lew. “Run Charts: A Simple and Powerful Tool for Process Improvement,” iSixSigma.com. Accessed March 30, 2017. https://www.isixsigma.com/tools-templates/control-charts/run-charts-a-simple-and-powerful-tool-for-process-improvement/.
- Wheeler, Donald J. and Chambers, David S., Understanding Statistical Process Control (Tennessee: SPC Press, 1992).
- Quality Council of Indiana. The Certified Six Sigma Black Belt Primer, Second Edition (Indiana: Quality Council of Indiana, 2012).
- Tubiak, T.M. and Benbow, Donald W. The Certified Six Sigma Black Belt Handbook, Second Edition (Wisconsin: ASQ Quality Press, 2009).
- Pyzdek, Thomas. The Six Sigma Handbook (McGraw-Hill Education, 2003).
- Minitab Statistical Software V17.
- Krishnamoorthi, K.S., “Capability Indices for Processes Subject to Unilateral and Positional Tolerances,” Quality Engineering, Vol. 2, Issue 4, 461-471.
- Tahan, Antpine and Levesque, Sylvain. (2009). “Exploiting the process capability of position geometric tolerance according GD&T ASME Y14.5M,” doi: 10.1109/ICCIE.2009.5223885.
